
For this project, I will be using a Pico W to monitor the temperature, humidity, and other environmental conditions of a room in my house. To accomplish this, I will be utilizing several different components that were purchased through either https://www.pishop.ca/ (if you're in Canada) or https://shop.pimoroni.com/ (if you're in the USA). The specific parts I will be using include a Pico W (with pre-soldered pins), a BME688 sensor for measuring air quality, and a Pico Inky display.
Please note that while the BME688 device in the provided link comes with a header pin, you will need to solder the pin onto the device in order for it to function properly.
To begin, the first step is to set up the Pico W. You can follow the tutorial provided by Pimoroni at https://learn.pimoroni.com/article/getting-started-with-pico for guidance on this.
In this tutorial, I used the pimoroni-picow_inky_frame-v1.19.18-micropython.uf2 (https://github.com/pimoroni/pimoroni-pico/releases) file to add to the Pico W when it is first plugged in. Please follow the directions in the "First step" link above for instructions on how to do this. Additionally, since this is a Pico W, you will need to use the following code below for the first LED program in order for it to work properly.
Pico W (with pre-soldered pins) - https://www.pishop.ca/product/raspberry-pi-pico-w-with-pre-soldered-headers/ BME688 - https://www.pishop.ca/product/bme688-4-in-1-air-quality-breakout-gas-temperature-pressure-humidity/ Pico Inky - https://www.pishop.ca/product/pico-inky-pack/
from machine import Pin
import time
#The line below that is commented Please see note below the code for an explanation
# led = machine.Pin(25, machine.Pin.OUT)
led = Pin("LED", Pin.OUT)
while True:
     led.toggle()
     time.sleep(2)
As noted in the pimoroni tutorial:
⚠ If you have a Raspberry Pi Pico W, you'll need to initialize the LED slightly differently - some of the pins were switched round to make room for the wireless functions. Instead of led = machine.Pin(25, machine.Pin.OUT) use led = machine.Pin('LED', machine.Pin.OUT).
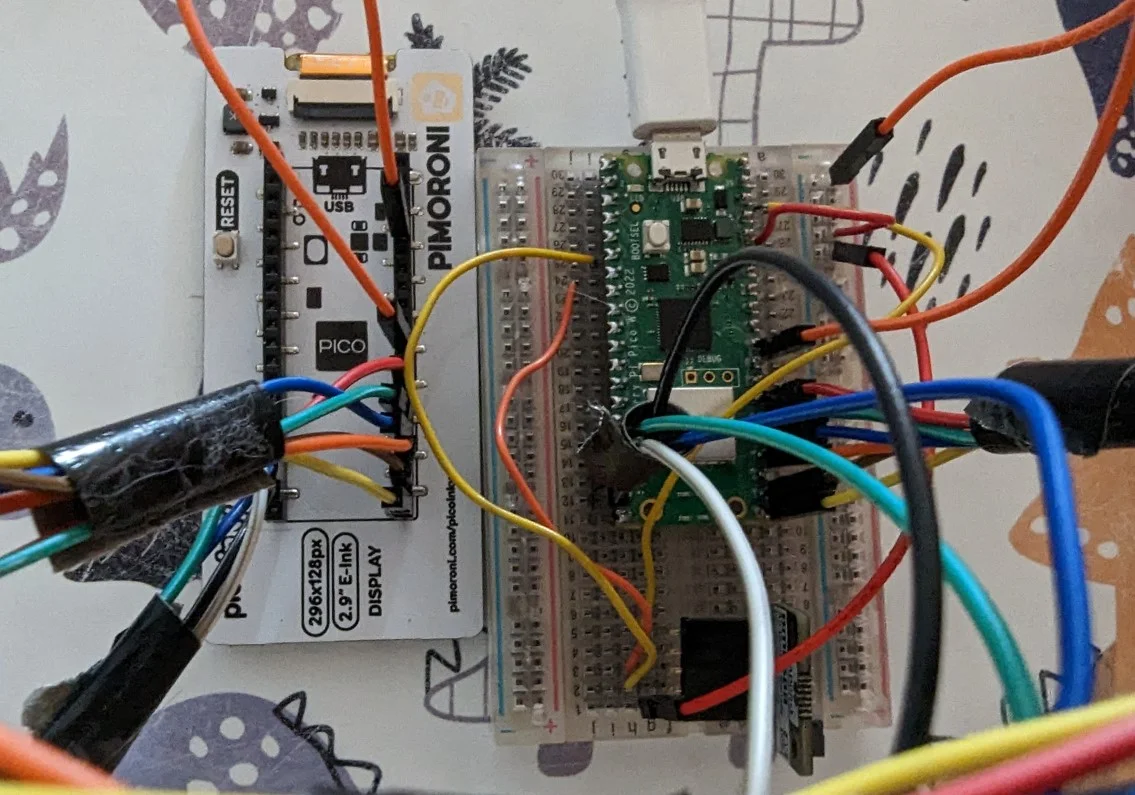
After confirming that the LED program is functioning properly, we can proceed with setting up the BME688. To do this, you will need to connect the Pico W to the BME688 using the following pins. Please refer to the Pico W layout below to identify the locations of the pins.
Once hooked up you can run the following code to test it.
import time
from breakout_bme68x import BreakoutBME68X, STATUS_HEATER_STABLE
from pimoroni_i2c import PimoroniI2C
from machine import Pin


i2c = PimoroniI2C(sda=(4), scl=(5))
led = Pin("LED", Pin.OUT)


bme = BreakoutBME68X(i2c)
while True:
    temperature, pressure, humidity, gas, status, _, _ = bme.read()
    print("{:0.2f}c, {:0.2f}Pa, {:0.2f}%, {:0.2f} Ohms".format(
            temperature, pressure, humidity, gas))
    led.toggle()
    time.sleep(2)
If working correctly the output should look like this:
25.11c, 99303.38Pa, 39.41%, 213422.27 Ohms
With that working, lets set-up the Pico Inky.
Please visit this link to see the schematics of the Pico inky
https://www.pishop.ca/product/pico-inky-pack
Please visit this link to see the layout of the Pico W.
https://datasheets.raspberrypi.com/picow/PicoW-A4-Pinout.pdf
Once its all wired up you can test the pico-inky with this code:
# This example shows you a simple, non-interrupt way of reading Pico Inky Pack's buttons with a loop that checks to see if buttons are pressed.

import time
from pimoroni import Button
from picographics import PicoGraphics, DISPLAY_INKY_PACK

display = PicoGraphics(display=DISPLAY_INKY_PACK)

# you can change the update speed here!
# it goes from 0 (slowest) to 3 (fastest)
display.set_update_speed(2)

display.set_font("bitmap8")

button_a = Button(12)
button_b = Button(13)
button_c = Button(14)


# a handy function we can call to clear the screen
# display.set_pen(15) is white and display.set_pen(0) is black
def clear():
    display.set_pen(15)
    display.clear()


# set up
clear()
display.set_pen(0)
display.text("Press any button!", 10, 10, 240, 3)
display.update()
time.sleep(0.5)

while True:
    if button_a.read():                                   # if a button press is detected then...
        clear()                                           # clear to white
        display.set_pen(0)                                # change the pen colour
        display.text("Button A pressed", 10, 10, 240, 3)  # display some text on the screen
        display.update()                                  # update the display
        time.sleep(0.5)
    elif button_b.read():
        clear()
        display.set_pen(0)
        display.text("Button B pressed", 10, 50, 240, 3)
        display.update()
        time.sleep(0.5)
    elif button_c.read():
        clear()
        display.set_pen(0)
        display.text("Button C pressed", 10, 90, 240, 3)
        display.update()
        time.sleep(0.5)
    time.sleep(0.1)  # this number is how frequently the Pico checks for button presses
If everything is working you can bring it all together and run this code to test both the BME and pico-inky together:
import time
from breakout_bme68x import BreakoutBME68X, STATUS_HEATER_STABLE
from pimoroni_i2c import PimoroniI2C
from machine import Pin
from pimoroni import Button
from picographics import PicoGraphics, DISPLAY_INKY_PACK
display = PicoGraphics(display=DISPLAY_INKY_PACK)
display.set_update_speed(2)
display.set_font("bitmap8")
i2c = PimoroniI2C(sda=(4), scl=(5))
led = Pin("LED", Pin.OUT)
button_a = Button(12)
button_b = Button(13)
button_c = Button(14)
def clear():
display.set_pen(15)
display.clear()
# set up
clear()
display.update()
display.set_pen(0)
bme = BreakoutBME68X(i2c)
while True:
temperature, pressure, humidity, gas, status, _, _ = bme.read()
print(pressure)
clear()
display.set_pen(0)
# For the 4 numbers (10,10,240,3) The first (10,10) is position.
# The (240) is maximum width of pixels
# (3) is font size
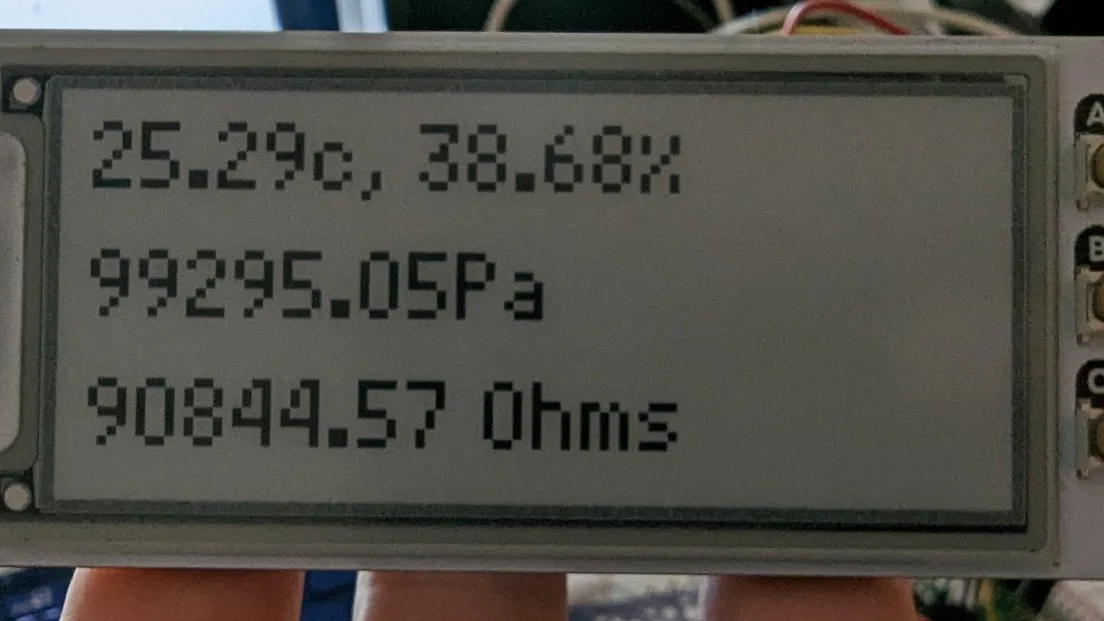
display.text("{:0.2f}c, {:0.2f}%".format(
temperature, humidity), 10, 10, 240, 3)
display.text("{:0.2f}Pa".format(pressure), 10, 50, 240, 3)
display.text("{:0.2f} Ohms".format(gas), 10, 90, 240, 3)
display.update()
print("{:0.2f}c, {:0.2f}Pa, {:0.2f}%, {:0.2f} Ohms".format(
temperature, pressure, humidity, gas))
led.toggle()
time.sleep(5)
Congratulations, if everything is working properly! Now, the more complex challenge is to use and interpret the data from the BME688 sensor. My ultimate goal is to integrate it with my home assistant, but before doing so, I plan on testing the sensor in various environments.